
Tips: Creating a KeyBoard Shortcut for "Private Browsing" mode in Safari...

For a variety of reasons I often find myself going into "Private Browsing" mode when using Apple's Safari browser on my Mac. Maybe I am on a public wi-fi connection at a coffee shop, or maybe I am using a friend's Mac for a quick Google search and want to give it back precisely how I received it - private browsing mode can be a handy way of accomplishing "leave no trace" browsing whenever it is needed.
Regardless of the need though, I really hate the process of enabling it: once in Safari, click the "Safari" menu in the top left menu, click "Private Browsing…", then click "ok" on the window that pops up shortly afterwards.
Is this really that much of a big deal to do? Of course it's not. But wouldn't it be easier if there was a keyboard command/shortcut to toggle private browsing mode on and off without touching your mouse or touchpad?
I think so and, luckily, it's really easy to set up.
The Steps…

1. Click the Apple Menu in the upper-left corner of your screen.
2. Choose "System Preferences" from the drop down menu.

3. Select the "Keyboard" option under "Hardware".

4. Click the "Keyboard Shortcuts" toggle at the top of the window.
5. Then click "Application Shortcuts" in the left column.
6. Now you just click the "+" button to add a new shortcut.
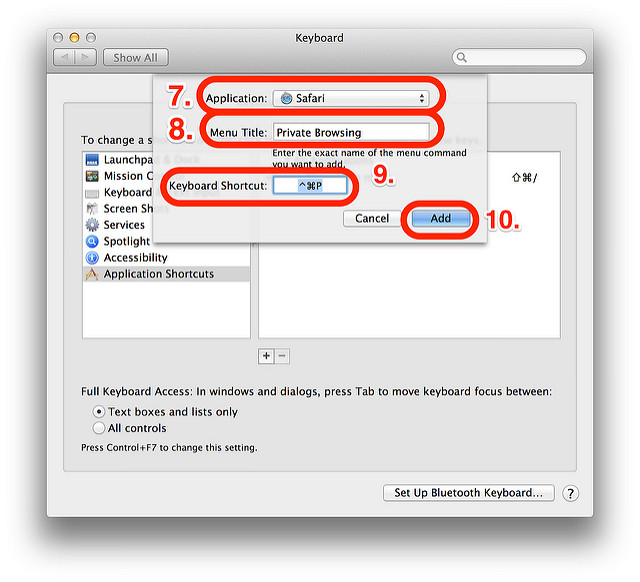
7. In the new window that pops up, select "Safari" from the top pulldown menu.
8. In the "Menu Title" field, type "Private Browsing".
9. In the "Keyboard Shortcut" field, type what ever you want your shortcut to be. For me I chose "Command-Control-P".
10. Click the "Add" button and you are done!
The Result...
Now when you are in Safari on your Mac and you want to quickly go into "Private Browsing" mode, all you have to do is type your new shortcut and it instantly toggles it on! To turn it off, just type the shortcut again. It's that simple.
I am absolutely sure this tip can be found elsewhere on the internet (there's no way this is a "new" idea). But I just wanted to write a quick walk-through on how to set it up for you all.
Hopefully it's useful to you too! :)